|
|
|
Who's Online
There currently are 6043 guests online. |
|
Categories
|
|
Information
|
|
Featured Product
|
|
|
 |
|
|
There are currently no product reviews.
 ;
An excellent service for the price, however, it would also have been handy if the troubleshooter pages were included. The manual is only sent in the language of your country, thus it looks as though there are some pages missing. Otherwise highly recommended.
 ;
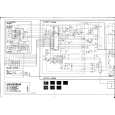
I am happy to get a rare TECHNICS SH-9090 Owner's Manual by PDF in clear copy.
;
Hr, klasse , good manual, verry fast on my e-mail, very usefull manual. rgds; ahm zeegers
;
I received the owners manual complete download. Wow did it help me. So glad for your website. Can you include an ownersmanual for people lol!
Thanks, sure I will be back
;
fast response great copy easy to download quick to correct mistakes
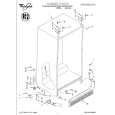
To reinstall shelf: 1. Hold shelf at front and back. 2. Tilt front of shelf up to a 45� angle to track. 3. Insert both rear shelf slides into upper channel of track. 4. Lower front of shelf to a level position. Make sure both rear shelf slides are securely in the track before letting go of shelf.
NOTE: Insert rear shelf slides into upper channel of track. /
Removing
the crisper
and crisper
cover
Pull out to the stop, lift the front, and pull again.
To remove the crisper: Slide the crisper straight out to the 1. stop. 2. Lift the front slightly. 3. Slide out the rest of the way. 4. Replace in reverse order.
Style
I
To remove the cover: 1. Hold cover firmly with both hands and lift front of cover off supports. 2. Lift cover out by pulling up and out. To replace the cover: 1. Fit back of cover into notch supports on walls of refrigerator. 2. Lower front into place.
Lift the cover front, then the back.
Style
2
To remove the cover: 1. Push up glass insert from the bottom, then slide out with both hands. 2. Lift front of cover frame. 3. Lift cover frame up and out. To replace the cover: 1. Fit back of cover frame into notch supports on walls of refrigerator, then lower front into place. 2. Slide back of glass insert into place, then lower front into place.
13
|
|
|
> |
|