|
|
|
Who's Online
There currently are 5996 guests online. |
|
Categories
|
|
Information
|
|
Featured Product
|
|
|
 |
|
|
There are currently no product reviews.
 ;
The manual was exactly what I wanted and I found it nowhere else. Thanks!
;
Having purchased a 1994 Kenwood music system from a Charity shop in 2013 (it was a high end product in its day), I found myself not quite knowing where to plug in what, and how to do this, that and the next thing. I needed a Manual, and after failure with another online 'Manual provider' I found Owner Manuals dot com. Well, I wasn't sure, but it was only $5, and if things didn't work out, I wouldn't have lost much...
But things DID work out. After paying my childrens inheritance money, $4.99, I was sent a Manual for my Kenwood System very quickly. Alas, it was in German, and being Scottish, I could not read it or get my system in order from it...a rapid email to them brought the English Manual in short order, and my retro-system was and IS up and running in it's regulation settings.
I am very grateful to http://www.owner-manuals.com for their quick service and for even having such an obsolete Manual in the first place! If you need a Manual for ANYTHING, try here first. I wouldn't be surprised if I bought a 1928 Marconi radio, and got the user Manual for THAT here too!
Top marks.
John Copeland
Glasgow
Scotland
;
I was so happy that the owner's manual was available. It is well written and helped me to use the radio/CD player/recorder without problems. Thanks for making it available.
Irene Lambert
;
Excellant!!! Very quick and easy....Best $4.99 I have spent in a very long time..
I highly recommend this.
;
Thanks so much for the Owner's manual for my Sony PS - FL1. I had purchased the turntable off of eBay. It came in and looked great. Packed well and appeared to be great. I balanced and aligned the tone are and hooked it up. When trying to play a record the tone are would move to the right place and just before it would drop to play it moved back off the edge of the record before touching down. I searched the net for an answer to this issue. No luck. Then I purchased the owners manual and sure enough there was a place to adjust where the stylus touched down. That adjustment solved the problem and saved me a $35 feet to have the player checked out. The manual is well written and easy to understand. It is a must have for anyone with this front loading Sony turntable.
To turn the ice maker on/off: (Style 2) The ON/OFF switch is located on the top right side of the freezer compartment. 1. To turn the ice maker on, slide the control to the ON (left) position. NOTE: Your ice maker has an automatic shut-off. The ice maker sensors will automatically stop ice production but the control will remain in the ON (left) position. 2. To manually turn the icemaker off, slide the control to the OFF (right) position.
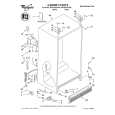
REFRIGERATOR FEATURES
Your model may have some or all of these features. Features that can be purchased separately as product accessories are labeled with the word �Accessory.� Not all accessories will fit all models. If you are interested in purchasing one of the accessories, please call the toll-free number on the cover or in the �Assistance or Service� section.
To remove and replace ice bucket: 1. Place four fingers in bucket base opening and rest thumb on the release button. 2. Holding the base of the bucket with both hands, depress the release button and lift the bucket up and out. It is not necessary to turn the ice maker control to the OFF (right) position. The ice maker will not produce ice without the bucket installed in the door.
Important information to know about glass shelves and covers: Do not clean glass shelves or covers with warm water when they are cold. Shelves and covers may break if exposed to sudden temperature changes or impact, such as bumping. For your protection, tempered glass is designed to shatter into many small, pebble-size pieces. This is normal. Glass shelves and covers are heavy. Use special care when removing them to avoid impact from dropping.
Refrigerator Shelves
The shelves in your refrigerator are adjustable to meet your individual storage needs. Your model may have glass or wire shelves. Storing similar food items together in your refrigerator and adjusting the shelves to fit different heights of items will make finding the exact item you want easier. It will also reduce the amount of time the refrigerator door is open, and save energy.
s
Normal Ice Production should produce approximately 7 to 9 batches of ice in a 24-hour period.
Slide-out Shelves (on some models)
s s
To care for ice storage bin or bucket: 1. Empty the ice container. Use warm water to melt the ice if necessary. Never use anything sharp to break up the ice in the bin or bucket. This can cause damage to the ice container and the dispenser mechanism. 2. Wash ice bin or bucket with a mild detergent, rinse well and dry thoroughly. Do not use harsh or abrasive cleaners or solvents.
To slide out shelf, carefully pull front of shelf toward you. To slide in shelf, push shelf in until it stops.
REMEMBER:
s s s s
Allow 24 hours to produce the first batch of ice. Discard the first three batches of ice produced to avoid impurities that may be flushed out of the system. The quality of your ice will be only as good as the quality of the water supplied to your ice maker. Avoid connecting the ice maker to a softened water supply. Water softener chemicals (such as salt) can damage parts of the ice maker and lead to poor quality ice. If a softened water supply cannot be avoided, make sure the water softener is operating properly and is well maintained. It is normal for the ice cubes to be attached at the corners. They will break apart easily. For Style 1, do not force the wire shut-off arm up or down. Do not store anything on top or in the ice maker or ice bin or bucket.
To remove and replace a shelf in a metal frame: 1. Pull the shelf forward to the stop. 2. Tilt the front of the shelf up and lift it slightly as you pull the shelf from the frame. 3. Replace the shelf by guiding it back into the slots on the frame and pushing the shelf in past the stop.
Shelves and Shelf Frames
To remove and replace a shelf/frame: 1. Remove the shelf/frame by tilting it up at the front and lifting it out of the shelf supports. 2. Replace the shelf/frame by guiding the rear shelf hooks into the shelf supports. Tilt the front of the shelf up until rear shelf hooks drop into the shelf supports.
s s s
14
|
|
|
> |
|