|
|
|
Who's Online
There currently are 5926 guests online. |
|
Categories
|
|
Information
|
|
Featured Product
|
|
|
 |
|
|
There are currently no product reviews.
 ;
The manual was made available promptly. I is a clean scan of the original. I had no problem downloading it. The scan was well centered and cleanly formatted. It is as good a product as can be had without being the original document.
 ;
Received downlink in less then 8 hours, Item was in good copy condition, and told me how to program the clock timer. The price was very resonable, and the process was very automated and was GREAT to work with.
;
Fast service, document is OK. Thanks! Searched for it long time.
;
I was very pleased with the manual I got for my amateur (ham) radio. Without it I could not figure out how to input and/or change the P/L setting on my radio. It drove me nuts as the radio was essentially useless. That all changed when my manual came. Then it took only minutes and I was done. Now my radio works fine. This is an exceptionally good resource as it's a very easy and user friendly download. Thank you very much! Dziękujemy za!
;
It answered my question, which was how to load the paper. I did notice that the very end of the manual was not visible.
Style 2 To remove and replace the glass cover: 1. Pull the glass straight out. 2. Replace the glass by pushing it straight in.
Frozen food storage guide
Storage times will vary according to the quality and type of food, the type of packaging or wrap used (should be airtight and moisture-proof), and the storage temperature. Seal the package or container securely to prevent taste and odor transfer throughout the product. Ice crystals inside a sealed package are normal. This simply means that moisture in the food and air inside the package have condensed, creating ice crystals. Put no more unfrozen food into the freezer than will freeze within 24 hours (no more than 2-3 lbs of food per cubic foot [907-1,350 g per L] of freezer space). Leave enough space in the freezer for air to circulate around packages. Be careful to leave enough room for the door to close tightly. NOTE: For more information on preparing food for freezing, check a freezer guide or reliable cookbook.
Fruit and vegetable storage guide
Fruits: Wash, let dry and store in refrigerator in plastic bag or crisper. Do not wash or hull berries until they are ready to use. Sort and keep berries in original container in crisper, or store in a loosely closed paper bag on a refrigerator shelf. Vegetables with skins: Place in plastic bag or plastic container and store in crisper. Leafy vegetables: Wash in cold water, drain and trim or tear off bruised and discolored areas. Place in plastic bag or plastic container and store in crisper.
Utility or Egg Bin
(on some models -Accessory)
Depending on your model, you may have a one, two or three piece bin. Eggs may be stored in the egg tray or loose in the bin. NOTE: Store eggs in a covered container for long term storage. If your model does not have an egg storage bin, store eggs in their original container on an interior shelf.
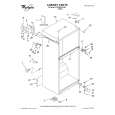
DOOR FEATURES
Your model may have some or all of these features. Features that can be purchased separately as product accessories are labeled with the word �Accessory.� Not all accessories will fit all models. See the �Assistance or Service� section if you are interested in purchasing one of the accessories.
Drop-in Door Rails
The door rails may be removed for easier cleaning. To remove and replace the rails: 1. Remove all items from the shelf and pull straight up on each end of the rails. 2. Locate each end of the rail above the rail�s pocket opening, and push the rail straight down until it stops.
FREEZER FEATURES
Your model may have some or all of these features. Features that can be purchased separately as product accessories are labeled with the word �Accessory.� Not all accessories will fit all models. See the �Assistance or Service� section if you are interested in purchasing one of the accessories.
Freezer Shelf
(on some models)
To remove and replace the freezer shelf: 1. Remove items from the shelf. 2. Lift back of shelf over stop and slide shelf straight out. 3. Replace the shelf by sliding the back of the shelf into the tracks on walls of cabinet. 4. Be sure to slide the shelf in all the way.
11
|
|
|
> |
|