|
|
|
Who's Online
There currently are 6043 guests online. |
|
Categories
|
|
Information
|
|
Featured Product
|
|
|
 |
|
|
There are currently no product reviews.
 ;
This manual covers the main equipment features only. While it also includes the procedure for saving and loading from the now long obsolete memory cards it does not mention the how to operate with the optional floppy drive interface so I am still at a loss about how to use this! Note that there is a separate manual covering the MIDI interface and programming via the keyboard, not included in this download. You will also need to get hold of this if you want to use the MIDI interface properly. Basically there is little difference between this manual and the free to download manual for the similar PR60 model.
;
Good list of manuals. I found a very rare one and easily get. Should be promptly to download, as we must to wait hours even after confirmed payment.
;
The manual was properly scanned and perfectly readable. The only small problem is that I couldn't use my dear Ctrl + F to find a word I needed.
;
Nothing wrong with the manual or the delivery - came to me the same day I ordered it. But afterwards I realized that I ordered the wrong manual. Probably better with the Quick start - version. So maybe it would be better if we could see a list with inhold for each manual before ordering?
 ;
Bought T4850 High End Tuner a few years ago, but i didn't know where all the buttons were used for. So i purchased the owners manual. Perfect! Just what i needed.
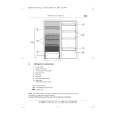
Vorgehensweise
0 Neigen Sie das Gerät etwa 45 nach hinten und lehnen Sie es gegen eine Wand o.ä.
O
Sehr wichtig ist, da� der Rückwandverflüssiger [lo] (Rohrgitter)dabei nicht verbogen oder beschädigt wird. Legen Sie daher das Gerät keinesfalls auf den Rücken.
1. Nehmen Sie zuerst die Sockelblende durch einfaches Abziehen nach vorne ab und setzen Sie den Einsatz der Sockelblende von von links nach rechts ein.
2. Lösen Sie die 3 Scharnierschrauben [a] an der rechten Geräte-Unterseite. 3 Lösen Sie die Gewindeschraube mit Unter. legscheibe [b]am Scharnier. Nehmen Sie das Scharnier mit Verstellfellfu� [c] ab und hängen Sie die Tür nach unten aus. 4. Lösen Sie an der Türunterseite die Schraube am Sockelstück [e] und ziehen Sie das Sockelstück ab. Schrauben Sie dieses Sockelstück links an der Türunterseite wieder an. 5. LösenSiedieSchraubedes [d] Standfü�chens an der linken Geräte-Unterseite ab, nehmen dieses und Sie ab schrauben es Sie gegenüber wieder ein. 6. SchraubenSie den Gewindebolzen [q, der rechts der an Unterseite der Zierleiste als Scharnierdiente, ab, indemSieihnentgegen dem Uhrzeigersinn drehen. Schrauben Sie diesen Gewindebolzen links an der Unterseite der Zierleiste wieder ein.
7. Schieben Sie jetzt die Tür von unten auf den linken Gewindebolzen und drücken Sie diesein Richtung Gerät; die Tür wird durch die MagnetTürdichtung festgehalten. 8. Stecken Sie das untere Scharnier in die �ffnung an der linken Unterkante der Kühlraumtür undschraubenSiedasScharniermitden 3 Scharnierschrauben [a] und der GewindeschraubeundUnterlegscheibe [b] am Geräterahmen fest. 9. Setzen Sie die Sockelblende durch einfaches Andrücken wieder auf.
Türgriff Den Türgriff versetzen Sie entsprechend die auf rechte Seiteder Kühlraumtür.
0 Ziehen Sie die graue Klebefolie an der Griffseite ab, lösen Sie die Schrauben und nehmen Sie den Griff ab. 0 Ziehen Sie die Kunststoffzapfen aus den Löchern auf der rechten Türkante und schrauben Sie den Türgriff an. Kleben Sie die graue Klebefolie wieder an.
0 Drücken Sie die Kunststoffzapfen in die freigewordenen Löcher an der linken Türkante.
0 �berprüfen Sie abschlie�end, ob die Magnetdichtung richtig anliegt. Sie darf nicht gequetscht sein und mu� überall gut abdichten.
|
|
|
> |
|