|
|
|
Who's Online
There currently are 5606 guests and
2 members online. |
|
Categories
|
|
Information
|
|
Featured Product
|
|
|
 |
|
|
There are currently no product reviews.
 ;
Received downlink in less then 8 hours, Item was in good copy condition, and told me how to program the clock timer. The price was very resonable, and the process was very automated and was GREAT to work with.
;
Fast service, document is OK. Thanks! Searched for it long time.
 ;
I was very pleased with the manual I got for my amateur (ham) radio. Without it I could not figure out how to input and/or change the P/L setting on my radio. It drove me nuts as the radio was essentially useless. That all changed when my manual came. Then it took only minutes and I was done. Now my radio works fine. This is an exceptionally good resource as it's a very easy and user friendly download. Thank you very much! Dziękujemy za!
;
It answered my question, which was how to load the paper. I did notice that the very end of the manual was not visible.
;
The product manual I received was exactly what I was looking for, delivered painlessly at a very fair price. I can't ask for any more than that.
USING A MEAT THERMOMETER
Insert the thermometer into the center of the largest muscle of meat, or in the inner thigh or breast of poultry. For an accurate reading, the tip of the thermometer should not touch bone or gristle or rest in a pocket of fat. As the meat cooks, the thermometer may slip from its original position. If the reading of the thermometer seems unusually high for the length of time the meat has cooked, check the thermometer and reposition it if necessary. If you let a roast stand 10 to 20 minutes after you remove it from the oven, it will be easier to carve and the internal temperature will raise as it stands. Remove the roast from the oven when the thermometer reads 5OF to lOoF less than the internal temperature you desire. If you do not plan to let the roast stand, leave the meat in the oven until the full temperature is reached.
Normally there should be 1 % to 2 inches of air space on all sides of each pan in the oven. See tips below.
When using a large flat pan that covers most of the rack, center on one rack.
When baking a sponge or angel food cake, center on one rack in the lowest position.
L
-
J
~~
Angel Food or Sponge Cake
J
Sheet Cake, Cookies, Biscuits
The pan or pans using the least amount of rack area should be placed on the lower of the two racks.
When using two racks and several pans, stagger them so no pan is directly above another.
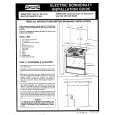
RACKANDPANARRANGEMENT
Put oven rack(s) in place before turning on the oven. Rack positions are numbered 1 to 4, starting at the bottom with number 1. In general, when using only one rack, position No. 2 should be used. When using two racks, positions No. 2 and 4 work best. Pans too close to each other, to oven walls or to the oven bottom block the free movement of air. Improper air movement causes uneven browning and cooking. Cake Layers, Pies, Casseroles, 3 Pans Cake Layers, Pies, 4 Pans (staggered)
CHOOSING
Aluminum
OVEN COOKWARE
Absorbs heat faster than glass or steel and conducts heat well. Produces delicate browning, tender crusts, and reduces spattering of roasts. Best for cakes, muffins, 1 quick breads, cookies and roasting. 1 Because this cookware absorbs heat quickly and holds it well, you should lower your 1 oven temoerature 25 OF. Gives food a deeo. crustv brown too. Best for casseroles. . Absorbs heat quicker than shiny cookware. Lower your oven temperature 25 OF (except for pastry). Good for pies and other foods baked in pastry shells.
Ovenproof Glass/ I Potterv Teflon: Dull or Darkened Cookware
1
24
|
|
|
> |
|